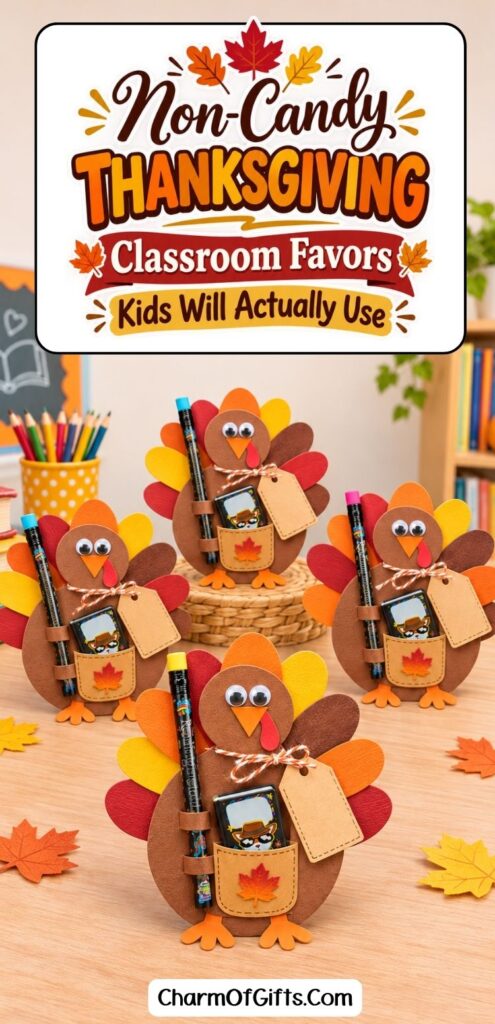
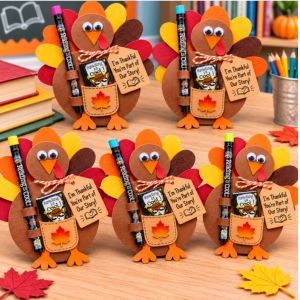
How adorable are these little Thanksgiving turkeys? And look closely, because they’re actually holding a pencil and a miniature book-shaped eraser!
I came across these cute reading-themed pencils and matching book erasers and thought they’d make the sweetest non-candy Thanksgiving classroom favors for students. But instead of simply tying them together with ribbon, I wanted to make something more festive.
So I turned them into colorful paper turkeys with bright fall feathers, two little loops for the pencil, and a pocket on the front where the tiny book eraser sits. The pocket takes a little extra care, but I’ll show you exactly how to make it.
You could place one on each child’s desk before Thanksgiving break or arrange them in a classroom basket. The children get a funny little turkey to take home, plus a pencil and eraser they can use in their schoolwork.
The pocket might look a bit intimidating but I promise once you get the hang of it you can make these favors in bulk in one afternoon.
P.S: This post contains affiliate links from Amazon and other retailers. If you make a purchase through these links, I will receive a small commission. Pls check Privacy Policy and T&C for more information.)
The Reading Pencils and Mini Book Erasers Behind This Craft
The idea started with two school supplies from the same Reading Rocks range: black wooden pencils covered in colorful book-themed designs, and miniature erasers shaped like little books. The designs are bright enough to show through without needing to wrap either item.
The pencil sits along one side of the turkey, while the eraser peeks out of a kraft-paper pocket on its belly. I like leaving the upper part of the book visible. It’s such a cute detail, especially when you make several of these together.
You can use similar school supplies if you already have them, but measure your eraser first. A flat paper pocket made for one size might be too tight for another.
Supplies for These DIY Thanksgiving Turkey Pencil Holders
- Dr Seuss-themed wooden pencil per favor
- One mini book-shaped eraser per favor
- Sturdy brown cardstock for the oval bodies and heads
- Red, orange, yellow and dark-brown cardstock for feathers
- Orange and red paper scraps for beaks and wattles
- Kraft cardstock for the eraser pockets
- Brown cardstock strips for the pencil loops
- Two small googly eyes per turkey, or paper eyes drawn with a marker
- Glue stick or craft glue, double-sided tape or glue dots
- Scissors, pencil, ruler and a brown marker
- Optional: small paper leaf cutouts or autumn stickers for the pockets
Choose a fairly firm cardstock for the body, since it needs to hold both the pencil and the eraser. Regular construction paper is fine for the feather fan, but very thin paper can bend under the weight of the supplies.
The Paper Pieces to Cut First
Before preparing enough pieces for a whole class, make one complete turkey and check the proportions against the actual pencil and eraser you’re using. These are good starting measurements:
- Oval body: about 7 inches tall by 5 inches wide
- Round head: about 2½ inches across
- Feathers: eight rounded shapes, each about 3 to 4 inches long
- Pencil loops: two strips, each about ½ inch wide by 2 inches long
- Eraser pocket: start with a shape around 2¼ inches wide by 2 inches tall; adjust after testing the eraser
I would draw one paper template for the body and one for a feather. Once you like how the first turkey looks, you can trace the shapes onto the rest of your cardstock without measuring every piece again.
How to Make the Thanksgiving Turkey Classroom Favors
Let’s assemble one turkey from start to finish. It’s easier to sort out the small adjustments now than to find out the pockets are too narrow after cutting 30 of them.
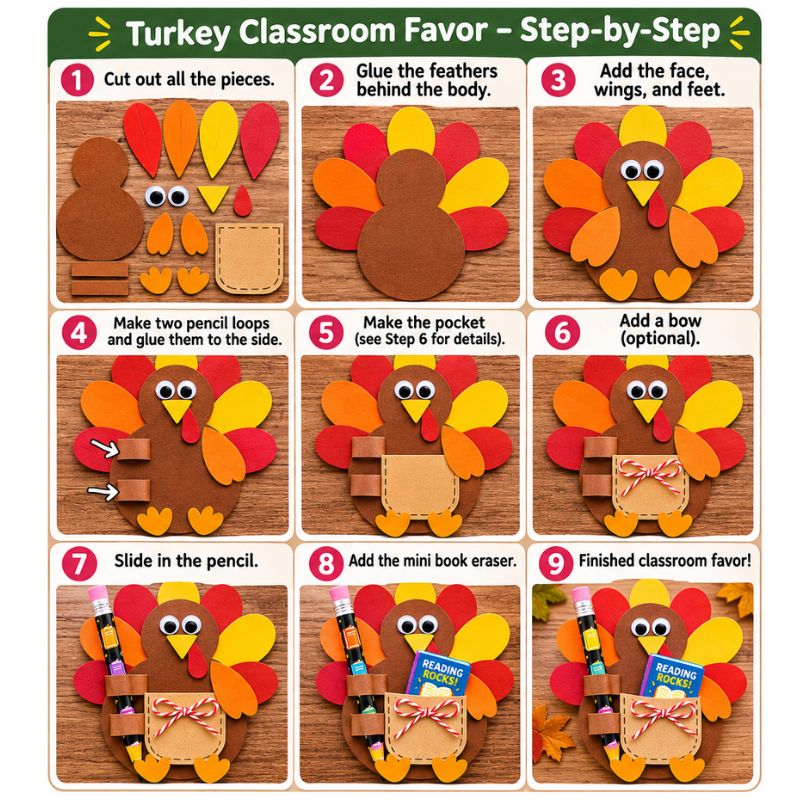
1. Cut Out the Turkey’s Brown Oval Body
Draw a large oval on brown cardstock and cut it out. A simple way to make both sides even is to fold a piece of scrap paper in half, draw half an oval against the fold, cut it, and unfold it. Use that as your tracing template.
Keep the front of the oval empty for now. The pencil will go on one side, and the eraser pocket will sit beside it, closer to the bottom.
2. Make the Head and Funny Little Face
Cut a lighter-brown cardstock circle about 2½ inches across and attach it near the top center of the oval. Add two googly eyes, a small orange triangle for the beak, and a curved red paper wattle.
I like slightly oversized eyes on these. Some of the finished turkeys end up looking surprised, and others look rather serious, which makes a whole basket of them even cuter.
3. Add the Bright Feather Fan
Cut around eight rounded teardrop-shaped feathers in yellow, orange, red and dark brown. Arrange them behind the oval in a fan, alternating the colors. Let the feathers extend beyond the top and sides of the body so they’re clearly visible.
Turn the oval over and glue the overlapping ends of the feathers to its back. Check the arrangement from the front before the glue sets. Don’t worry about making all the feathers exactly identical.
4. Make Two Paper Loops for the Pencil
Cut two narrow brown cardstock strips about ½ inch wide and 2 inches long. Place your pencil vertically along the left side of the turkey’s body to see where the loops should go.
Wrap the first strip loosely around the pencil to size it. Remove the pencil, then attach the two ends of that strip to the turkey body so the center rises into a small loop. Make a second loop lower down, using the pencil to check the alignment.
Let the adhesive dry, then slide the pencil through both loops. The pencil should be held upright but still pull out without tearing the paper. If the loops grip too tightly, remake them a little wider.
5. Check Where the Book Eraser Will Sit
Put your mini book eraser beside the pencil, toward the lower right side of the turkey’s belly. Move it around until the two school supplies look balanced.
The pocket should cover the lower part of the eraser, not hide its colorful front cover. Once you’re happy with the position, make a light pencil mark on the turkey body where the pocket will go.
6. Make the Little Kraft-Paper Pocket for the Eraser
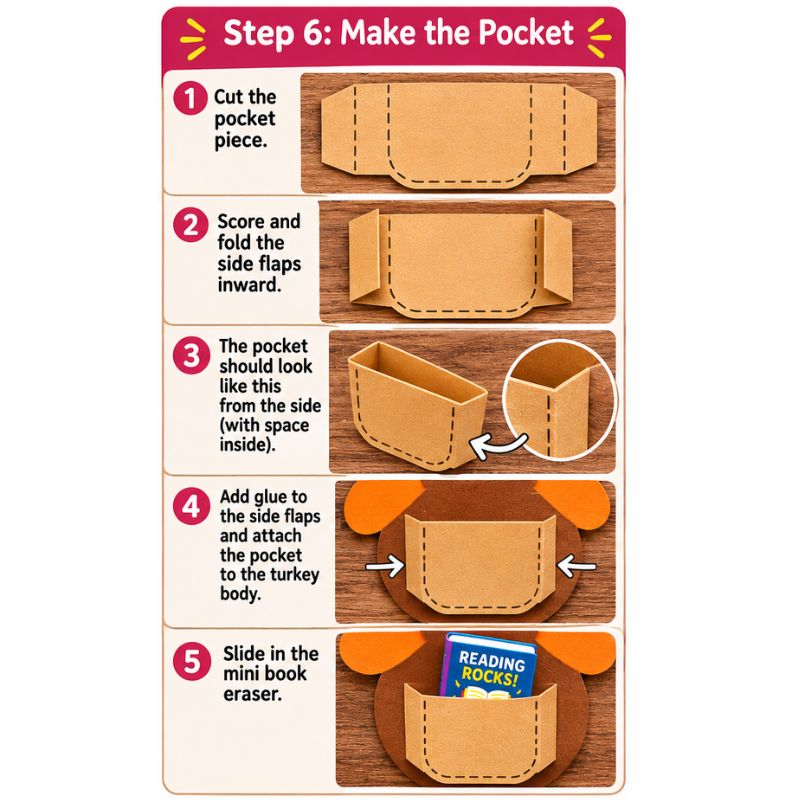
This is the part to take your time over. The mini book eraser has some thickness, so a pocket glued completely flat may look fine but not actually hold it. I made a separate step-by-step graphic for this section.
cutting the full pocket with side tabs, scoring, folding inward, attaching the tabs, and inserting the eraser. The bottom flap is folded and secured as explained below.
Cut the full pocket piece, including its tabs. The visible front panel can start at about 2¼ inches wide and 2 inches high, but do not cut only that rectangle. Add about ¼ inch of depth and a ⅜-inch glue tab to EACH side, plus an extra bottom flap about ⅝ inch deep. That makes the full cutout approximately 3½ inches wide by 2⅝ inches high before trimming its lower corners. Keep the pocket top open. Test these dimensions against your actual mini book eraser first.
Add the little details. Before attaching the pocket, draw dashed brown lines just inside the left, right and bottom edges to look like stitching. A tiny paper leaf in the center is a nice finishing touch, but it’s optional.
Score and fold the side gussets. On each side, mark two vertical fold lines: one where the front panel ends and one between the ¼-inch side wall and the ⅜-inch glue tab. Fold the side walls backward at the front edges, then fold the glue tabs inward so they sit against the turkey body. The center panel should now stand slightly forward instead of sitting flat against the brown cardstock. Fold the bottom flap inward too, to close the base.
Glue only the attachment tabs. With the side folds formed, attach the left and right glue tabs to the turkey body. Attach the folded bottom flap to close the pocket’s base and prevent the eraser from falling out. Keep all glue away from the central front panel and leave the entire top opening clear.
The side walls should give the eraser room to slide inside.
Test it before making more. Let the glue dry, then slip the eraser into the open top. The lower part should sit securely inside while the little book cover remains visible. If it catches or bends the paper, widen the pocket or add more depth. Never glue the eraser itself in place.
7. Check the Finished Turkey
Slide the pencil into its loops and the eraser into its pocket. Lift the turkey gently by the cardstock body and check that both items stay in place. Then try removing them, just as a student would.
If you like, add a little paper leaf or draw a few feather details. There’s no need for a printed gift tag or any special message. The turkey, pencil and tiny book eraser already make a charming little Thanksgiving gift.
My Assembly Plan for 24 or 30 Students
I wouldn’t make these one at a time. There are too many small paper pieces, and you’ll spend half the afternoon switching between cutting, gluing and finding supplies.
For 24 students, plan on 24 bodies, 24 heads, about 192 feathers, 48 pencil loops and 24 pockets. If you’re making 30 favors, you’ll need 30 bodies, 30 heads, about 240 feathers, 60 loops and 30 pockets.
Cut the bodies and heads first, then prepare all the feathers.
For feathers, you can fold your desired paper multiple times so you cut once but get 4-6 feathers. You will need a heavy duty scissor if you want to cut card stock that has been folded a few times. You can also opt for plain colored paper that is thinner than card stock for this.
Next, cut the pencil strips and pockets, draw stitching on every pocket, and sort the pieces into separate stacks. Assemble the feather fans and faces before attaching loops and pockets.
I would do the pockets in one batch, following the same sample every time. Test each one with an eraser as the glue dries, and save inserting the pencils and books until the very end.
A parent volunteer or another teacher could help cut the feathers while you assemble the pockets. With all the pieces organized, putting together a classroom basket is much more manageable.
How to Hand Out These Thanksgiving Gifts to Students
These would look adorable lined up on a teacher’s desk, with their bright paper feathers sticking up in rows. You could also put one on each student’s desk as a surprise before Thanksgiving break.
If you’re carrying them to school, arrange them flat in a shallow box rather than standing them all upright in a bag. That helps keep the feathers from bending and stops the erasers from slipping out.
For younger students, use paper eyes instead of small detachable googly eyes if appropriate, and check the products’ recommended age ranges. The small erasers and decorative parts aren’t suitable for every age group.
I especially like that the children can take the pencil and book eraser out of the turkey and use them immediately. And if one wants to keep the cheerful paper turkey on their desk afterward, that’s lovely too.
A Little Turkey Carrying Its Own School Supplies
The miniature book peeking out of its pocket is still my favorite part of the finished craft. Alongside that colorful reading pencil, it makes the turkey look as though it’s proudly carrying everything it needs for school.
It’s a fun handmade Thanksgiving surprise from teacher to students, and the children have two useful little gifts to bring home. If you’re planning a classroom celebration, I can easily imagine a whole tray of these bright turkeys waiting for the children on the last school day before the holiday.
For another non-candy classroom idea with fewer paper pieces, take a look at my Thanksgiving turkey favors made with popsicle-shaped erasers.
***
You might also like these Thanksgiving ideas:
Also Check Out: