If you are looking for an easy DIY Christmas gift that feels homemade, personal, and genuinely worth keeping, this air dry clay Christmas photo frame is such a fun one to make. It holds three Polaroid style photos, can be customized for almost anyone, and you definitely do not need to be an experienced clay crafter to make it.
I especially love DIY gifts like this because you can make them well ahead of Christmas. There is no December 23rd panic involved. Make the frame, give the air dry clay plenty of time to dry, choose your photos, and your gift is ready.
And I have a feeling that if you make one successfully, you may end up making several. One for Grandma, another for your parents, one for a friend who moved away, perhaps another for a coworker. Simply changing the colors and photographs can make the exact same DIY feel completely different for each person.
You could even pair the finished photo frame with homemade cookies, fudge, hot chocolate mix, or another edible treat. If you want a larger homemade gift basket, choose something from my 100 DIY food gift ideas to add alongside it. A handmade photo frame and something delicious from your kitchen would make a lovely Christmas gift for grandparents, aunts, friends, coworkers, neighbors, or family.
The frame I made is bright Christmas red with simple green holly leaves and red berries. I deliberately kept the decorations minimal because I wanted the photographs to be the part you notice first.
P.S: This post contains affiliate links from Amazon and other retailers. If you make a purchase through these links, I will receive a small commission. Pls check Privacy Policy and T&C for more information.)

Why Make a Handmade Photo Frame When You Can Buy One?
Of course you can walk into a department store and buy a photo frame. You could probably find a beautiful one without spending very much either.
But that is not really the point of a handmade gift.
Something changes when you can tell someone, “I made this for you.” You spent your own time choosing the colors, working with the clay, picking photographs and creating something specifically with that person in mind.
That sentimental value is very difficult to buy.
I think this would be especially meaningful for someone you do not get to see very often. Maybe your best friend has moved away. Your adult child is living in another country. Your parents live several hours away. Or perhaps Grandma is living in an assisted living community and doesn’t get to see the grandchildren every week.
Imagine making this frame with the grandkids, putting three of their photographs inside and taking it to Grandma for Christmas.
She isn’t going to care whether every piece of clay is perfectly straight.
She is going to care that her family sat down and made something especially for her. And I can absolutely imagine her proudly telling visitors, “My grandchildren made this for me.”
That is what makes handmade gifts special.
They don’t have to look like something produced in a factory. In fact, the tiny imperfections are part of their charm because you can see that somebody actually made them.
What You Need to Make an Air Dry Clay Christmas Photo Frame
You don’t need a huge collection of craft supplies for this project.
- Air dry clay
- Red and green acrylic paint if you are starting with white clay
- A rolling pin or smooth bottle
- A craft knife or clay cutting tool
- A ruler
- A small amount of water for smoothing
- A paintbrush
- Three Polaroid style photographs
- Clear water based craft varnish or sealer, optional
- A flat protected surface for working and drying
You can also start with colored air dry clay. If you already have red and green clay, that saves you the painting step.
I would choose an air dry clay that is intended for craft and modeling projects and that dries firm enough for decorative pieces. Avoid an extremely soft, fluffy children’s modeling compound for the main slab. We need the base to become reasonably rigid once dry.
The exact amount of clay will depend on how large you make your frame and how thick you roll the slab.
Before cutting anything, place your three photographs next to one another. That gives you a much better idea of how large your base needs to be.
Why I Used Air Dry Clay Instead of Terracotta Clay
Terracotta would seem like an obvious choice for this project because that warm reddish color already feels perfect for fall and Christmas.
Traditional terracotta, however, is an earthenware clay. To turn it into a durable finished pottery piece, it is normally fired at high temperatures in a kiln.
That immediately makes our simple Christmas DIY considerably less beginner friendly.
Air dry clay doesn’t require a kiln. You shape it at home, leave it exposed to air, and it gradually hardens as its moisture evaporates.
That is exactly what I wanted for this project.
We are making a decorative tabletop photo holder, not dinnerware or an outdoor plant pot. There is no real reason to complicate the project with traditional pottery clay when air dry clay can give us the handmade look we want.
And we don’t lose the gorgeous Christmas color either. Use red air dry clay or paint white clay once it is completely dry.
How to Make the Air Dry Clay Christmas Photo Frame
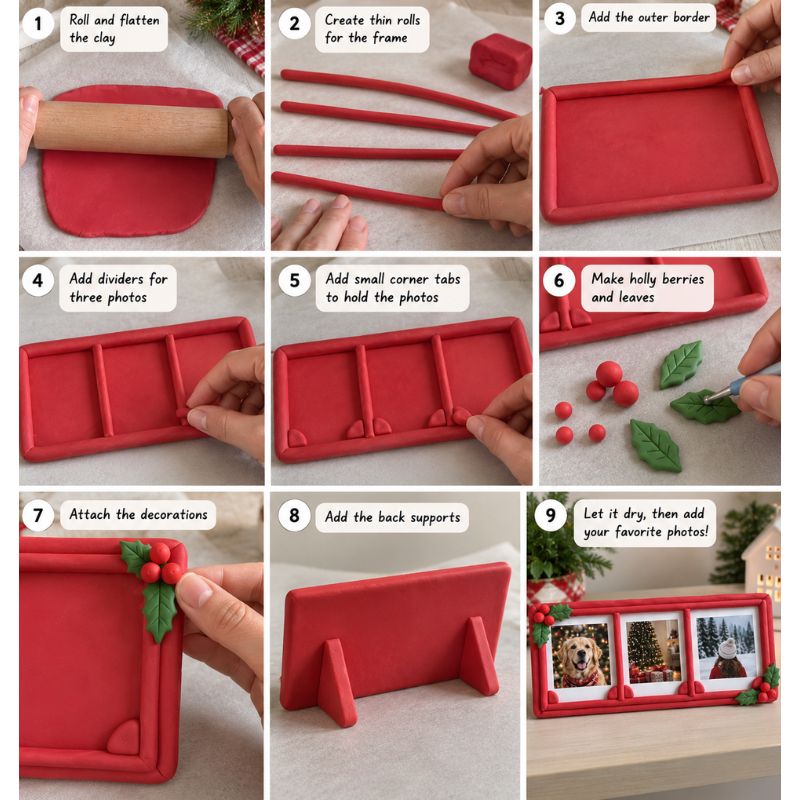
1. Roll Out the Main Clay Slab
Start by kneading your air dry clay until it feels workable.
Roll it into one large flat rectangular slab. Try to keep the thickness reasonably even, but don’t worry about achieving absolute perfection.
Remember that this slab forms the entire back of our frame. We aren’t cutting three photo holes into it or digging deep spaces into the clay.
That is one of the reasons I think this project is manageable for beginners.
Place your three photos over the slab while planning the size, leaving enough clay around the outside for the border.
Remove the photographs before continuing.
2. Trim the Slab Into a Rectangle
Use a ruler and clay tool or craft knife to straighten the four sides.
You can leave the corners slightly rounded if you prefer the softer handmade appearance.
Run a damp fingertip gently along rough cut edges to smooth them.
Don’t add too much water. A tiny amount is usually enough for surface smoothing.
3. Roll Thin Pieces of Clay for the Photo Borders
Now we make the raised frame.
Take smaller pieces of red clay and roll them between your hands and work surface until you have long, thin clay ropes or coils.
These do not need to look machine perfect. Try to keep them approximately the same thickness so the finished frame looks balanced.
Lay the clay strips around the outside edge of the slab.
Then add two vertical strips to divide the center into three photograph spaces.
Instead of carving three recessed areas into a thick block of clay, we are essentially building our borders upward on top of a simple flat slab.
That makes the construction much easier.
4. Attach the Raised Clay Borders
Gently press the strips onto the slab.
You want them attached firmly enough that they won’t simply fall away after drying, but don’t press so hard that you completely flatten the rounded shape.
Smooth the joining points carefully with your finger or clay tool.
If your air dry clay manufacturer recommends a particular joining method for attaching pieces, follow those instructions as formulations can vary.
And don’t panic if your lines aren’t completely straight.
This is a handmade Christmas gift. Slightly uneven clay actually gives it character.
5. Make Little Tabs to Hold the Photos
Now we need to solve an important problem: keeping our photographs in the frame.
Rather than permanently gluing the photos down, make small pieces of clay that overlap the corners of each photograph slightly.
These will become little photo tabs.
Use a spare piece of cardstock cut to the same dimensions as your photographs while positioning them. That way you can check that the tabs overlap enough to hold a picture without accidentally embedding your actual photograph into damp clay.
Once everything has dried, the photographs can tuck underneath the tabs.
This also means the recipient can change them later.
6. Make the Holly Leaves and Berries
For the Christmas decoration, I kept things very simple.
Roll several tiny pieces of clay into round berries. Then flatten small pieces of green clay and shape them into holly leaves.
You can lightly mark the veins using a clay tool or toothpick.
Arrange a small cluster of berries and leaves in one corner. Add another smaller cluster on the opposite side if you like.
You really don’t need much more.
I purposely wouldn’t add snowmen, Santa faces, candy canes and lots of Christmas ornaments to this particular frame. The red, green and holly already tell you that it is Christmas themed without making the finished gift feel childish.
7. Add Supports to the Back
Turn your attention to the back of the frame.
Make two sturdy triangular supports from clay and attach them toward either end of the back. These work a little like the stand on the back of a tabletop photo frame.
Check the angle before leaving everything to dry.
If triangles seem difficult to shape, don’t make this part harder than it needs to be.
You could make a thick rounded support instead. If you are running low on red clay, use another color because nobody is going to see much of the back anyway.
You can even use leftover clay colors and combine them for the supports.
The important thing is simply that the finished frame stands securely.

How Long Does Air Dry Clay Take to Dry?
This is one Christmas craft I would not make the night before you plan to give it.
Air dry clay drying times vary considerably depending on the brand, thickness of the project, room conditions and humidity. A thin ornament will naturally dry much faster than our relatively substantial photo frame.
Allow at least a couple of days in your Christmas crafting schedule rather than assuming it will be ready overnight, and follow the drying instructions on your particular clay package.
Because our project has thicker borders, decorations and supports, those areas may take longer to dry than the flat slab.
Don’t rush to paint or seal clay that still feels damp.
Customize Your Christmas Photo Frame
This is where you can really have fun.
Ours is red on red with green holly because I wanted a traditional Christmas look. But there is absolutely no rule saying yours has to look the same.
Keep the base red and make the raised photo borders green. Make the base green and borders red. Use cream with red accents for something softer.
You could even use yellow, pink, blue or whatever colors the recipient loves.
This would also be such a fun Christmas craft to make with kids. Let them choose the colors. Let them roll the clay strips. Let them make the berries.
If the berries aren’t perfectly round, who cares?
Grandma certainly won’t.
Make the Photos Part of the Christmas Gift Basket
Don’t give this frame empty.
For me, the photographs are what give this cute air dry clay craft its meaning as a Christmas gift.
Choose three photographs that mean something to the recipient.
For grandparents, that could be pictures of the grandchildren. For someone who has moved away, include photographs from home. For a friend, use memories from trips or celebrations you’ve shared.
You could include the dog they adore, their childhood home, your last Christmas dinner together, an old family photograph, or simply a wonderfully silly picture that makes them laugh.
Better yet, print a small stack of additional Polaroid style photos and give those with the frame.
Then they can swap the pictures whenever they feel like it.
That also takes this project beyond Christmas. The red frame can hold Christmas photographs in December, family pictures in January, vacation memories in summer and new photographs as the years go by.
How to Make Your Handmade Photo Frame Gift Worthy
Let the frame dry completely and tidy up any rough areas before gifting it. If you painted the clay, make sure the paint is thoroughly dry too.
A compatible clear sealer can give the finished surface some additional protection, but check that the product is suitable for the particular air dry clay and paint you used.
Put three photographs into the finished frame and place the extra photos in a small envelope.
Then wrap everything together.
For a larger Christmas gift, add homemade cookies, fudge, snack mix, coffee syrup or another homemade treat. This would be particularly lovely when you’re making gifts for several relatives without wanting to buy another generic Christmas present for everyone.
You can use one of my 100 DIY food gift ideas to build the frame into a complete homemade Christmas gift basket.
And don’t worry about making yours look exactly like mine.
If your border is slightly crooked, your holly leaf looks more like an ordinary leaf, or you had to make a completely different support because you ran out of clay, the gift still works.
The person opening it isn’t going to inspect your clay technique.
They’re going to see their grandchildren, their dog, their family, their best friend or a memory they love sitting inside something you took the time to make especially for them.
And that is precisely why I would make this instead of buying another photo frame from the store.
Have fun making it, and I’m sure you’ll receive plenty of compliments and heartfelt thank yous when the recipient opens the gift. Happy holidays!
***